Anchor's Choice: Discover the Best Way to Secure Your Dock


Why Proper Anchoring Makes or Breaks Your Floating Dock Investment
The best way to anchor a floating dock depends on your specific water conditions, but here are the proven methods that work:
Quick Answer - Best Anchoring Methods:
- Lakes & Ponds: Stiff arm anchoring with 600 lbs at corners
- Rivers & Tidal Areas: Cable anchoring with mushroom anchors (150-200 lbs)
- Deep Water/High Current: Pile anchoring with UHMW rollers
- Chain Layout: Crisscross pattern every 24-30 feet
- Chain Length: 1.5 times water depth
Your floating dock is only as secure as its anchoring system. Without proper anchoring, even the best dock becomes a liability during storms, high winds, or changing water levels.
Research shows that floating docks actually prevent boat damage during hurricanes compared to fixed docks - but only when they're anchored correctly. The key is matching your anchoring method to your specific environment and conditions.
The stakes are high. A poorly anchored dock can drift away, damage neighboring property, or create safety hazards. But get it right, and your floating dock will adapt to water level changes while staying exactly where you need it.
The good news? There are proven anchoring methods that work for every situation - from calm lakes to tidal rivers to hurricane-prone coastal areas. Each method has specific weight requirements, installation techniques, and maintenance needs.

Glossary for best way to anchor a floating dock:
Step 1 – Read Your Waterway Before You Drill
Think of your waterway as a living, breathing environment that changes with the seasons, weather, and time of day. The best way to anchor a floating dock starts with understanding these unique conditions before you even purchase your first anchor.
We've worked on countless docks around Long Island, and the ones that fail almost always share one thing in common: the owner skipped the site assessment. Don't be that person who ends up chasing their dock across the bay during a storm.
Your waterway assessment needs to cover the fundamentals that will determine your entire anchoring strategy. Water depth comes first - measure at low tide where your dock will sit, because this directly affects how much chain you'll need and what anchor weights will work. A dock that seems perfectly positioned at high tide might leave you scratching your head when it's grounded at low tide.
Bottom composition matters more than most people realize. Is it soft mud that will swallow a concrete block? Sandy bottom that shifts with storms? Rocky substrate that mushroom anchors can't penetrate? Each surface demands different anchor types and installation techniques.
Current strength separates calm lake installations from the more challenging river and tidal setups. Even moderate current creates lateral forces that can slowly drag inadequate anchors across the bottom. Tidal range adds another layer of complexity - your anchoring system must handle not just horizontal forces, but significant vertical movement throughout the day.
Don't underestimate wind fetch - the distance wind can travel across open water before hitting your dock. A small pond might only generate ripples, while a mile of open water can create waves that test your anchoring system's limits.
For us here on Long Island, ice load becomes a serious consideration. Ice expansion can snap chains, shift anchors, and create forces that summer installations never face. Zoning permits and environmental impact requirements vary by municipality, and some areas restrict certain anchor types or require professional installation.
The regulatory side isn't just red tape - it's protection for sensitive marine environments and your neighbors' property values. We've seen floating docks prevent severe damage to boats during hurricanes, but only when they're properly anchored and comply with local regulations.
Map Your Conditions
Create a simple depth chart of your dock area using a weighted line or fish finder. Mark depths at low tide, note whether the bottom feels like mud, sand, or rock, and identify any underwater obstacles like old pilings or large rocks.
Document your tide range if you're in tidal waters. Measure the difference between high and low tide over several days to get an accurate picture. This information becomes crucial when calculating chain lengths and anchor spacing.
Factor in Storm & Hurricane Risk
Long Island's coastal position means storm preparation isn't optional - it's essential for protecting your investment. Check NOAA data for your specific area to understand maximum wind speeds and storm surge heights your anchoring system must withstand.
Consider how your dock anchoring fits into broader storm strategies. Some boaters create hurricane holes - protected areas where boats can ride out severe weather. Your dock's anchoring system should complement these preparations, providing security during normal conditions while allowing for emergency repositioning when major storms approach.
The time you spend understanding your waterway now will save you headaches, money, and potentially dangerous situations later.
The Best Way to Anchor a Floating Dock: Matching Method to Environment
Here's where everything comes together. The best way to anchor a floating dock isn't a one-size-fits-all solution - it's about understanding your water conditions and choosing the right approach.
Think of anchoring like choosing the right foundation for your house. You wouldn't use the same foundation for a beachfront home as you would for a mountain cabin. The same principle applies to dock anchoring.
Stiff arm systems work beautifully for protected waters where you want maximum stability. Cable anchoring gives you the flexibility needed for changing water levels and seasonal variations. Pole and sleeve systems handle high winds and waves like champions. Pile anchoring is your heavy-duty solution when nothing else will do.
The weight requirements change dramatically based on your environment. Protected lakes might get away with 450 pounds per corner, but the industry standard of 600 pounds per corner keeps most docks secure. If you're in hurricane territory or facing serious wave action, you're looking at 800+ pounds per corner.
Here's something many dock owners miss: the crisscross chain pattern matters more than the anchor type. This X-configuration prevents your dock from swaying side to side and keeps everything stable when conditions get rough. Space your anchoring points every 24-30 feet along the dock for the best results.

| Environment | Best Method | Anchor Type | Weight Needed | Special Considerations |
|---|---|---|---|---|
| Lakes & Ponds | Stiff Arm | Concrete Blocks | 600 lbs corners | Shore attachment critical |
| Rivers | Cable | Mushroom | 150-200 lbs | Handle current forces |
| Tidal Zones | Cable | Mushroom/Helix | 200+ lbs | Account for range |
| Ocean/Exposed | Piles | Driven Piles | Variable | Professional installation |
Best Way to Anchor a Floating Dock in Lakes & Ponds
Calm lake waters give you the luxury of choosing the most stable anchoring method. Stiff arm anchoring often becomes the best way to anchor a floating dock in these protected environments because it creates an almost fixed position while still allowing some vertical movement.
The beauty of stiff arm systems lies in their simplicity and strength. You install concrete pads or driven posts on shore, then connect galvanized steel arms that can extend up to 60 feet. Include winch systems for seasonal adjustments - trust us, you'll appreciate this feature when it's time to move the dock for winter storage.
Pole and sleeve systems work wonderfully in smaller lakes. The poles essentially bury themselves into the lake bed without requiring heavy equipment for driving. The winches make removal for winter storage much easier than fighting with heavy anchors.
600-pound minimum at the furthest corners. Even in calm lakes, summer storms can create surprising forces on your dock.
For detailed installation guidance specific to lake environments, check out our comprehensive guide on Anchoring a Floating Dock to Shore.
Best Way to Anchor a Floating Dock in Rivers & Tidal Zones
Rivers and tidal areas are where anchoring gets interesting. The water never stops moving, levels change constantly, and your dock needs to handle both horizontal forces from current and vertical movement from tides. Cable anchoring typically proves to be the best way to anchor a floating dock in these dynamic conditions.
Cable anchoring adapts beautifully to changing water levels while handling current and tidal forces. It's also cost-effective for most applications and allows seasonal repositioning when needed.
Mushroom anchors weighing 150-200 pounds work well for typical 12x12 foot dock sections. The key is following the chain scope rule: use 1.5 times the water depth for proper holding power. So if you're anchoring in 12 feet of water, you need 18 feet of chain.
Here's a pro tip: position your dock behind natural barriers whenever possible. A small island or point of land can dramatically reduce current forces, sometimes cutting your anchoring requirements in half.
Tension cords help maintain consistent tension while allowing for water level changes. They're particularly valuable in areas with large seasonal variations - think spring snowmelt or fall drawdowns.
Learn more about handling dynamic water conditions in our detailed Floating Dock Anchoring Systems guide.
When to Choose Piles or Helical Anchors
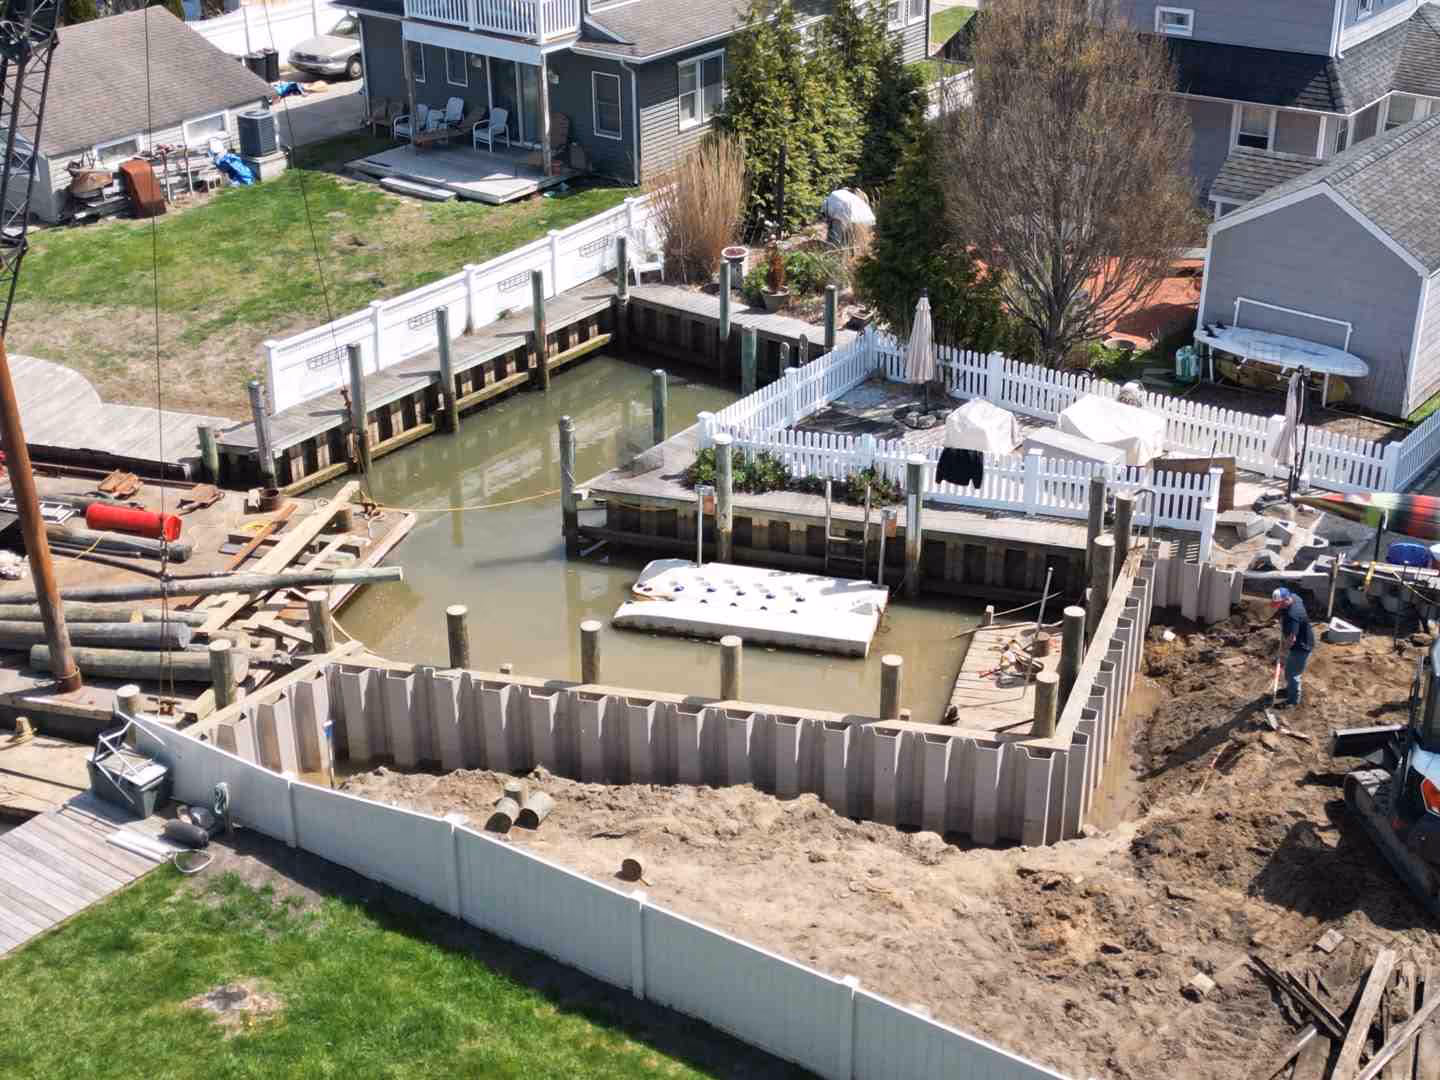
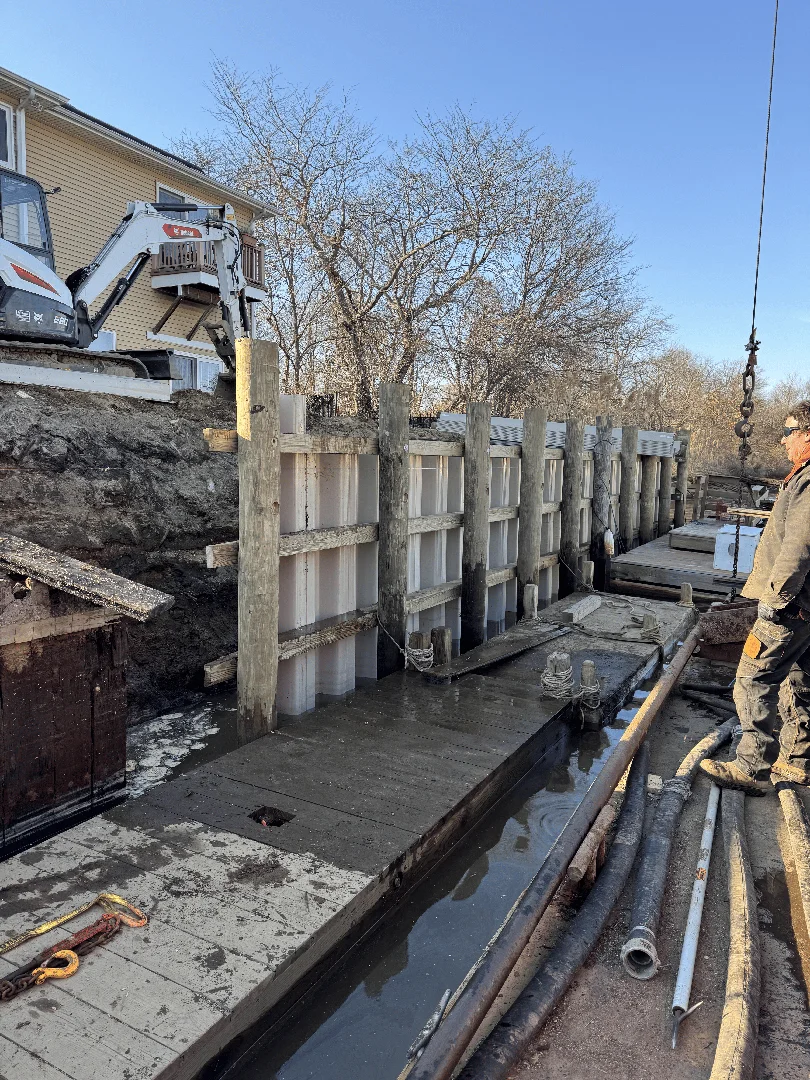
Sometimes you need to bring out the big guns. Pile anchoring becomes necessary when you're dealing with deep water installations over 20 feet, high current areas exceeding 2 knots, large docks supporting multiple boats, or any commercial applications.
Pile systems offer maximum stability and load capacity while handling extreme weather conditions. They accommodate changing water levels through pile slides and provide long-term durability that other methods can't match.
UHMW-PE rollers in pile slides create quiet, smooth vertical movement. These specialized rollers work with wood, steel, concrete, or fiberglass piles and make a huge difference in how your dock feels underfoot.
Helical anchors excel in soft bottom conditions where traditional anchors might drag. They screw into stable soil layers and provide excellent holding power, though they require professional installation and specialized equipment.
The decision often comes down to load requirements and environmental conditions. If you're supporting heavy loads or facing severe weather exposure, pile systems become not just preferable but necessary for safety and insurance purposes.
Step 2 – Materials, Weights & Layout That Don't Slip
After years of installing floating docks around Long Island, we've learned that the best way to anchor a floating dock comes down to using the right materials and understanding some basic physics. Get this wrong, and your dock might look secure but fail when you need it most.
Here's what separates amateur installations from professional ones: knowing that a 150-pound concrete anchor only weighs about 75 pounds underwater. That's Archimedes' principle in action - and it's why so many DIY anchoring systems fail.
Your material list should include galvanized chain (1/4" minimum for smaller docks, 3/8" for larger water bodies), marine-grade stainless steel quick links, hot-dip galvanized eyebolts, and concrete anchors sized for your conditions. Standard concrete form kits create anchors measuring 22"L x 16"W x 11"H and weighing about 150 pounds each.
The 600-pound rule applies to most floating dock corners, but remember - that's underwater weight. You'll actually need roughly 1,200 pounds of concrete anchors to achieve 600 pounds of holding power once they're submerged.
Anchor spacing makes or breaks your system. Place anchors every 24-30 feet along your dock perimeter, with a minimum of 600 pounds at the furthest corners and 450 pounds for positions closer to shore. Exposed locations need even more weight.
The crisscross chain layout isn't just recommended - it's essential. This X-pattern between anchors prevents your dock from swaying side to side and distributes loads evenly across the entire anchoring system.
For more detailed anchor selection guidance, check our Dock Anchors for a Floating Dock guide.
Calculate Anchor Weight & Chain Scope
Your boat size affects anchor requirements more than most people realize. A single pontoon boat creates different loads than several kayaks, and your anchoring system needs to handle whatever you'll put on that dock.
Consider these factors when calculating weights: your dock's size and configuration, maximum boat capacity, typical wave height, wind exposure, and potential storm surge. Don't forget seasonal changes - spring ice breakup and fall storms can stress your system in ways summer conditions never will.
The chain scope calculation follows the 1.5x depth rule for most conditions. In 12 feet of water, you need 18 feet of chain for proper holding power. This creates the catenary curve that absorbs shock loads and prevents anchors from dragging.
High-current areas or deeper water might require 2x or even 3x the depth for adequate scope. The chain's curve acts like a spring, absorbing forces that would otherwise stress your anchors and dock connections.

Install & Tension the System Safely
Installation day requires careful planning and the right technique. We've developed a proven process that keeps everyone safe while ensuring your anchoring system works properly.
Start by preparing your platform. Use pressure-treated wood slabs to protect your dock surface during anchor handling. These anchors are heavy, and you don't want to damage your dock before you even get it anchored.
Position your anchors on the dock first. Assemble them completely, connect the chains, and tie everything together for coordinated lowering. This prevents tangled chains and ensures proper spacing.
Lower anchors carefully using planks as rails to slide them off the dock edge. Never just drop them - you could damage the dock or create dangerous situations. Install chains in that crucial crisscross pattern between anchors and dock eyebolts.
Set your tension with 1-2 feet of slack for water level changes. Too tight restricts natural movement; too loose allows excessive drift. For winch-adjustable systems, set initial tension at mid-range to allow for seasonal adjustments.
Consider hiring a diver for final inspection in deep water installations. They can verify anchor positioning and chain routing that you simply can't see from the surface. It's a small investment that can prevent big problems later.
Step 3 – Maintain, Inspect & Avoid Costly Mistakes
Your floating dock's anchoring system is like a chain - literally. It's only as strong as its weakest link, and that weak link often develops slowly over time.
The good news? Regular maintenance catches problems while they're still cheap to fix. We've seen too many dock owners learn this lesson the hard way when a $15 quick link failure leads to a $3,000 anchor system replacement.
Check your system twice a year - once before the busy season and once after. Look for obvious problems like loose connections, rusty hardware, or chains that seem to have shifted position. Your dock will tell you when something's wrong if you know what to look for.
Corrosion is your biggest enemy in marine environments. Even galvanized hardware eventually shows wear, especially in saltwater. Those little rust spots aren't just cosmetic - they're early warning signs that your hardware is losing strength.
Retighten all bolts and connections during each inspection. Marine environments create constant stress cycles that gradually loosen hardware. A few minutes with a wrench twice a year prevents major headaches later.
Replace worn parts immediately. That frayed chain link or corroded shackle won't get better on its own. Marine hardware is designed to fail safely, but only if you replace it before it reaches its breaking point.
The most expensive mistake we see is underweight anchors - using 300 lbs where 600 lbs is needed. Your dock might seem fine in calm conditions, but the first real storm will reveal the problem. Another common error is ignoring tide slack by making chains too tight, which restricts the vertical movement that makes floating docks work.
Wrong materials cause endless problems. Regular hardware store bolts and chains aren't designed for marine use. They'll corrode quickly and fail when you need them most. Always use marine-grade galvanized or stainless steel hardware.
For comprehensive guidance on connecting your dock to shore while maintaining proper movement, check out our guide on Attach Floating Dock to Shore.
Seasonal Tune-Ups
Winter preparation means thinking ahead. Ice expansion creates enormous forces that can damage even well-designed systems. Adjust your chain tension to allow for ice movement, and consider removing smaller dock sections in areas prone to heavy ice.
Hurricane season demands respect. Before storm season arrives, verify that your anchor weights meet the requirements for your area's storm surge potential. Plan your dock section removal procedures now, not when a storm is approaching.
Spring startup is when you find what winter did to your system. Check for ice damage, retighten connections that may have loosened, and adjust for changing spring water levels. Test all moving parts before the busy season begins.
Signs You Need a Pro
Some problems are beyond DIY fixes. Call for professional help when anchors consistently drag despite proper weight, when you notice seabed scouring around anchor points, or when your dock's capacity exceeds your current anchor system design.
Pile driving and helical anchor installation require specialized equipment and expertise. These aren't weekend DIY projects - they need professional engineering and installation to work properly.
Local regulations sometimes require professional installation, especially for larger docks or commercial applications. We've seen DIY installations work beautifully for simple lake docks, but complex tidal installations or high-load situations need professional attention.
At Pearce Marine Construction, we've been solving Long Island's marine construction challenges for generations. Sometimes the best way to anchor a floating dock is to let experienced professionals handle the complex parts while you enjoy the results.

Frequently Asked Questions about Floating Dock Anchoring
How much anchor weight do I really need?
Here's the question we get asked most, and the answer might surprise you. The famous 600 lb rule isn't just a number someone made up - it's based on real-world testing and decades of dock failures.
Your anchor weight depends on your exposure level. Protected lakes can get away with 450 lbs per corner, but that's cutting it close. Standard conditions need that full 600 lbs, and if you're in an exposed area or hurricane zone, bump it up to 800+ lbs per corner.
But here's the catch - and this trips up a lot of DIY installers. That concrete anchor weighs about half its dry weight once it's underwater. Your "300 lb" anchor is really only providing about 150 lbs of holding power on the bottom.
Chain scope matters just as much as weight. Use 1.5 times your water depth for proper holding power. So if you're anchoring in 10 feet of water, you need 15 feet of chain. This creates the catenary curve that absorbs shock loads and keeps your anchors from dragging.
We've seen too many docks with "heavy enough" anchors fail because the chains were too short. The best way to anchor a floating dock combines adequate weight with proper chain scope.
How do I attach a floating dock to shore without restricting vertical movement?
This is where many well-intentioned dock installations go wrong. You want to keep your dock in position, but you can't fight Mother Nature's tidal changes.
The secret is thinking like water. Your dock wants to float - that's what it's designed to do. Your job is to guide that floating motion, not stop it.
Hinged gangways are your best friend here. They connect to shore with pivot points that let the dock rise and fall with tides while keeping it accessible. Install shore brackets on your bulkhead or existing pilings that can handle the changing angles.
Flexible chain systems work beautifully too. Use longer chains with proper catenary curves that accommodate vertical movement. The chains should have enough slack to handle your full tidal range plus a safety margin.
The biggest mistake? Rigid connections that fight tidal movement. We've seen docks tear themselves apart because someone bolted them solid to a seawall. The dock should float freely up and down while staying put horizontally.
Can I DIY, or should I hire someone?
We love a good DIY project, but this question deserves an honest answer. Some floating dock anchoring projects are perfect for handy homeowners, while others really need professional expertise.
DIY works great for straightforward lake installations. If you've got a small to medium dock (under 20x20 feet) going into a protected lake with moderate depth and stable bottom, you can probably handle it yourself. You'll need basic tools, marine hardware knowledge, and a few strong helpers for anchor handling.
But some situations call for the pros. Any project requiring pile driving should be left to professionals - the equipment and expertise needed isn't worth the rental cost for a one-time job. Same goes for tidal or high-current locations where the engineering gets complex.
Large docks, commercial installations, and projects requiring local permits often need professional involvement. Some municipalities won't issue permits without a licensed contractor's stamp.
Here's our honest recommendation: Even if you plan to DIY, consider a design consultation with professionals. We can help you select the right anchoring method, calculate weights, and spot potential problems before you start. It's a small investment that can save you from expensive mistakes.
At Pearce Marine Construction, we've seen both successful DIY installations and costly do-overs. The best way to anchor a floating dock depends on your specific situation, skills, and local requirements. When in doubt, ask for help - your dock will thank you for it.
Conclusion
Choosing the best way to anchor a floating dock comes down to three timeless principles: know your site, match the anchor to the forces, and maintain the system. Follow those steps and your dock will rise and fall with Long Island’s tides while staying exactly where you placed it.
From Nassau’s quiet ponds to Suffolk’s exposed inlets, Pearce Marine Construction has seen stiff-arm anchors tame calm lakes, cable systems ride out shifting tides, and pile slides shrug off hurricane swells. What all successful projects share is the right weight, the correct chain scope, and hardware that’s built for salt water.
When those elements are in place, your dock becomes a worry-free extension of your shoreline—no drifting in storms, no scraped hulls, just seasons of safe mooring and sunset gatherings.
If you’re ready to secure a new dock or upgrade an existing one, our woman-owned team is here to help. We handle everything from depth surveys to final inspections, drawing on generations of local experience.
Explore our full capabilities on the Services: Boat Docks and Floating Docks page and let your dock’s foundation be as strong as Long Island’s maritime heritage.


Bring Your Vision to Life
Whether you're planning a custom dock, seawall, or boat lift, our experienced team is ready to deliver high-quality marine construction tailored to your needs. Pearce Marine Construction brings craftsmanship, precision, and a deep understanding of Florida’s waterways to every project. Let us help you create a durable, beautiful solution that stands the test of time. Get in touch now for a personalized estimate!