The Hard Truth About Building a Stone Retaining Wall on a Slope

Engineering Challenges of Building a Stone Retaining Wall on a Slope
#
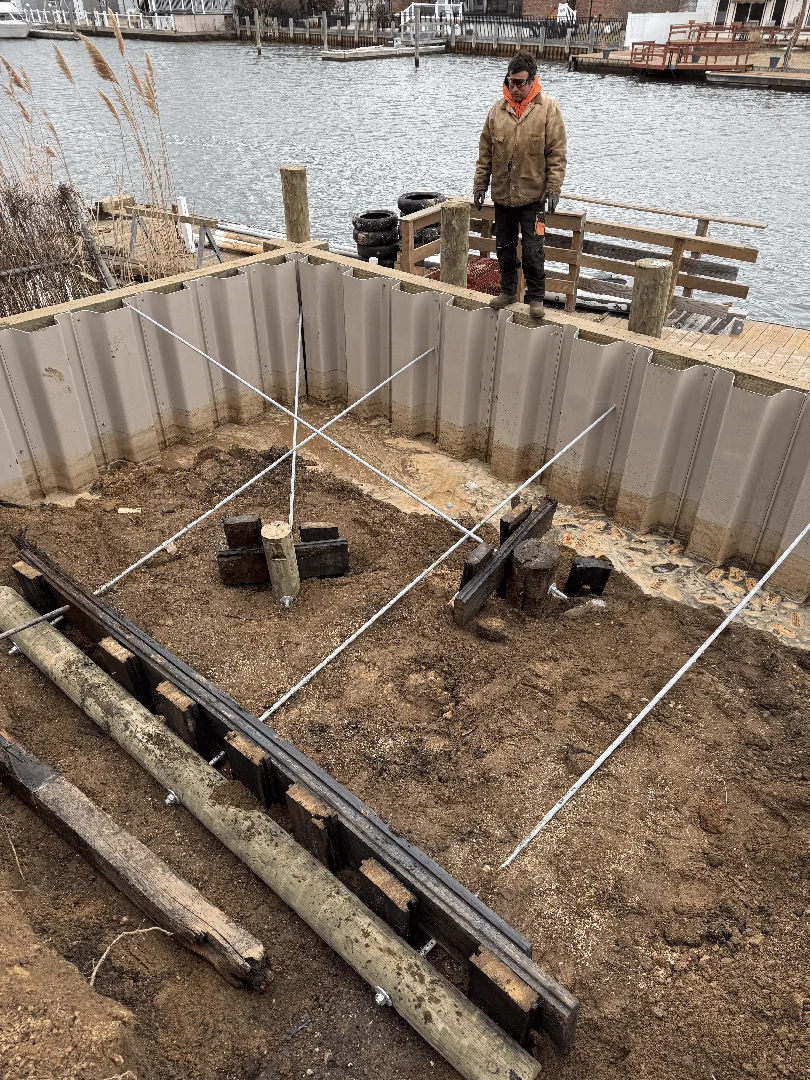
Building a stone retaining wall on a slope along Long Island's waterfront is a highly specialized marine engineering task. At Pearce Marine Construction, we design and install heavy-duty shoreline stabilization systems that prevent erosion and secure coastal bluffs.
Here is how our professional marine construction teams execute these projects:
Our Marine Engineering Process for Sloped Stone Retaining Walls
- Site and Slope Assessment — We measure gradient, analyze soil shear strength, and evaluate tidal/drainage conditions.
- Excavation and Subgrade Preparation — Our heavy equipment crews excavate to undisturbed subgrade, preparing a stable foundation below the frost line.
- Base Course Installation — We embed massive toe stones (approximately 10% of the wall height) below grade to prevent sliding.
- Engineered Batter — We construct the wall with a precise backward lean (batter) to resist lateral earth pressures.
- Marine-Grade Drainage Systems — We install perforated SDR-35 drainage pipes, non-woven geotextile fabric, and clean angular backfill to eliminate hydrostatic pressure.
- Compacted Backfilling — We backfill and compact the soil in controlled lifts to ensure structural integrity.
- Capping and Shoreline Integration — We secure heavy capstones and grade the upland area to direct runoff away from the coastal slope.
While some property owners search for cheap retaining wall ideas, marine-grade shoreline stabilization requires professional engineering. Standard DIY methods simply cannot withstand the hydrostatic pressure, tidal forces, and freeze-thaw cycles unique to Long Island's coastal environments.
Our specialized approach to building retaining walls ensures that every structure we build is engineered for maximum longevity. As premier retaining wall ideas and marine infrastructure specialists, we focus on slope mechanics, advanced drainage design, and heavy stone selection to protect your waterfront property.


When we tackle a sloped shoreline or a bluff on Long Island, we aren't just stacking heavy rocks. We are fighting gravity, soil mechanics, and lateral earth pressures. A slope naturally wants to find its angle of repose—the steepest angle at which loose material remains stable. When we cut into that slope to build a wall, we disrupt its natural equilibrium.
The sheer weight of the uphill soil (the surcharge load) exerts massive lateral pressure against the back of the wall. If the slope gradient is steep—such as a 30% to 35% incline common along the North Shore bluffs—the lateral forces increase exponentially.
Without precise calculations of soil shear strength and structural load-bearing limits, a wall built on a slope will eventually yield to rotational failure (tipping forward) or sliding failure (pushing outward at the base). For a comprehensive breakdown of these structural dynamics, consult our Retaining Wall Construction Guide.
Soil Mechanics and Slope Assessment for Heavy Stone Structures
Understanding the geology beneath our feet is the first step in preventing catastrophic slope failure. On Long Island, our team encounters highly variable soil profiles. Nassau County geology features a mix of dense sand, gravel, and pockets of heavy clay, while the Suffolk County landscape is dominated by glacial till—unsorted sediment left behind by retreating glaciers.
These soil types behave very differently under load:
- Sandy Soils: Offer excellent natural drainage and high internal friction, making them highly stable, but they require careful compaction to prevent shifting.
- Clay Soils: Act like a giant sponge. They hold water, swell when wet, shrink when dry, and exert immense hydrostatic pressure when saturated.
Before placing a single stone, we conduct rigorous soil compaction tests and slope assessments. For steep grades, we often design tiered or terraced wall systems rather than a single massive barrier. Terracing breaks up the vertical rise, distributing the soil load safely across multiple levels and preventing the localized soil failures detailed in this guide on How to Build a Retaining Wall on Slope | CDA Performance Construction.
Designing Drainage Systems to Prevent Hydrostatic Failure
Water is the ultimate enemy of any retaining structure. When rain or tidal surges saturate the soil behind a wall, the water weight creates hydrostatic pressure. If that water cannot escape, it will easily push a multi-ton stone wall out of alignment. Additionally, in our cold Northeast winters, trapped water freezes, expands, and causes frost heave that can tear apart even the heaviest masonry.
To mitigate this, we design and install multi-layered marine-grade drainage systems:
- Perforated Drain Pipes: A 4-inch perforated SDR-35 or schedule 40 PVC pipe is laid directly behind the base course, sloped at a minimum 1% grade to direct water to daylight or a dedicated drainage basin.
- Weep Holes: Integrated outlets spaced strategically along the wall face to relieve immediate water buildup.
- Non-Woven Geotextile Fabric: This industrial-grade fabric lines the entire excavation trench, separating the native soil from our drainage stone to prevent fine silt from clogging the system.
- Angular Crushed Stone Backfill: We backfill directly behind the wall with clean, 3/4-inch angular crushed stone (never rounded pea gravel) in a column at least 12 inches wide. This provides an immediate, high-flow path for water to drop straight down to the footing pipe.
By managing the water table behind the structure, we preserve the soil's shear strength and protect your investment. Learn more about regional drainage solutions in our guide to Long Island Retaining Walls.
Structural Masonry: Dry-Stacked vs. Mortared Techniques when Building a Stone Retaining Wall on a Slope
Choosing the right construction methodology is critical when building a stone retaining wall on a slope. The two primary approaches—dry-stacked and mortared—rely on completely different engineering principles.
| Feature | Dry-Stacked Gravity Walls | Mortared Structural Walls |
|---|---|---|
| Primary Physics | Friction, gravity, interlocking mass | Rigid adhesion, reinforced concrete footings |
| Water Management | Naturally free-draining through open joints | High hydrostatic pressure; requires absolute waterproofing |
| Freeze-Thaw Performance | Flexible; shifts slightly with frost and settles back | Rigid; prone to cracking if the footing moves even slightly |
| Max Safe Height (Unengineered) | Up to 3 feet | Up to 3 feet (requires deep concrete footings) |
| Reinforcement | Geogrid and deep tieback stones | Rebar, concrete back-poured cores, and tiebacks |
For most sloped residential and shoreline applications on Long Island, a dry-stacked gravity wall or a flexible heavy armor stone system is structurally superior. Because dry-stacked walls lack rigid mortar joints, they can flex slightly with seasonal temperature swings and soil settling without cracking.
To maximize stability, we build dry-stacked walls with a distinct "batter"—angling the wall face backward into the slope at a rate of 1 inch of setback per 12 inches of vertical height (approximately a 5-to-10-degree lean). We also interlock the stones, stagger all vertical joints, and install deep "through-stones" (tiebacks) that extend deep into the hillside every few feet to anchor the wall face to the compacted backfill.
For highly detailed specifications on dry-stack masonry physics, review the techniques outlined by the experts at How to Build a Dry-Stacked Stone Retaining Wall - GTA Masonry.
Professional Construction and Shoreline Stabilization on Long Island

Stabilizing a sloped waterfront property requires heavy machinery, commercial-grade materials, and a deep understanding of local marine environments. Whether we are protecting a bluff in Huntington or reinforcing a canal-side slope in Babylon, our construction process is engineered for decades of heavy-duty performance. For more information on Suffolk-specific regulations and designs, see our resource on Retaining Walls Suffolk County.
Step-by-Step Professional Execution for Building a Stone Retaining Wall on a Slope
When our crews execute a sloped stone retaining wall project, we follow a strict sequence of engineering steps:
- Precision Excavation: Using specialized excavators, we cut into the slope using a "cut-and-fill" method, creating a flat, stable terrace. We dig the foundation trench down to undisturbed subgrade—well below the local frost line.
- Subgrade and Footing Compaction: We compact the native soil subgrade using heavy vibratory plate compactors. We then lay down a non-woven geotextile fabric and add 6 to 12 inches of 3/4-inch clean, angular crushed stone, compacting it in 2-inch lifts to create an unyielding foundation.
- Placing the Base Course: The first course of stone is the most critical. We select the largest, heaviest armor stones as "toe stones" and bury them completely below grade (accounting for roughly 10% of the total wall height) to prevent the base of the wall from sliding outward.
- Staggered Stacking and Batter: We lay subsequent courses of heavy natural stone, checking for level on every single rock. We stagger all vertical joints (bridging gaps) and maintain a consistent backward batter.
- Geogrid and Tieback Integration: For walls on steep slopes, we roll out high-strength synthetic geogrid reinforcement between stone courses, extending it several feet back into the hillside to mechanically tie the wall to the earth.
- Lift-by-Lift Backfilling: We place our drainage stone and fabric behind the wall, backfilling with clean soil in 8-inch "lifts," compacting each layer thoroughly before moving to the next course of stone.
- Capstone Anchoring: We finish the wall with heavy, flat capstones, anchoring them securely to prevent shifting from foot traffic or water action.
For additional execution tips tailored to Nassau County properties, explore our Retaining Walls Nassau County Tips.
Why Long Island Properties Require Marine-Grade Retaining Solutions
Long Island's unique coastal geography demands more than standard residential landscaping. Waterfront properties in Merrick, Bellmore, West Islip, West Hampton, and Southampton face constant exposure to high water tables, tidal fluctuations, storm surges, and severe salt spray.
A standard contractor using basic blocks simply cannot deliver the longevity required for these harsh conditions. At Pearce Marine Construction, we bring generations of waterfront engineering and meticulous craftsmanship to every project. We understand how to design retaining walls that integrate seamlessly with bulkheads, docks, and shoreline revetments to prevent erosion and secure your property against the elements.
When you need structural integrity that stands up to the Atlantic, choose a team with local marine expertise. Contact Pearce Marine Construction for Professional Seawall and Retaining Wall Services and let us secure your shoreline for the future.


Bring Your Vision to Life
Whether you're planning a custom dock, seawall, or boat lift, our experienced team is ready to deliver high-quality marine construction tailored to your needs. Pearce Marine Construction brings craftsmanship, precision, and a deep understanding of Florida’s waterways to every project. Let us help you create a durable, beautiful solution that stands the test of time. Get in touch now for a personalized estimate!